How to Achieve a Braidless Sew-In for All Hair Textures
Key Highlights
Braidless sew-ins offer a more versatile and protective way to install hair extensions without the need for traditional braiding.
- This technique is healthier for natural hair as it reduces tension on the scalp and minimizes the risk of breakage.
Braidless sew-ins can be customized to suit all hair textures and types, providing a seamless and natural look.
Maintaining a braidless sew-in is relatively easy. You'll need to adjust the extensions as your natural hair grows and follow a proper hair care routine.
- With proper care, braidless sew-ins can last for several weeks, allowing you to enjoy your stunning hairstyle.
Introduction
Welcome to our salon blog! Here, you can find everything about hair extensions. If you want a way to style and protect your natural hair, a braidless sew-in could be a great choice. This new technique is gaining a lot of attention in the beauty world. It offers many advantages compared to regular braiding methods.
Understanding Braidless Sew-ins

In the world of hair extensions, new ideas keep surprising us. The time when braiding was the one way to attach those beautiful wefts is over. Now, there is an exciting new method called braidless sew-ins.
This method attaches hair extensions to your natural hair using techniques like micro rings or beads. With this way, you do not need to braid. It also puts less stress on your scalp, so it’s a softer and more comfortable choice for every hair type.
The Basics of Braidless Sew-in Technique
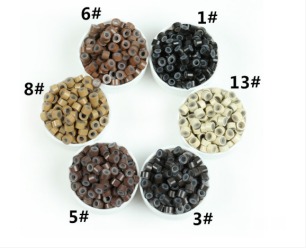
Micro rings, also called micro links or microbeads, are small, round beads covered with silicone. They hold hair well without hurting your natural hair. You can find these rings in different colors to match various hair shades. This helps them blend in smoothly.
To use them, start by taking a small part of your natural hair and threading it through a micro ring. Next, use a special tool to close the ring, which attaches the extension to the natural hair. You will do this several times all over the head, placing the extensions in a way that looks natural and adds volume.
This method does not need braids, which can feel tight and uncomfortable. Instead, it gives a flatter and more natural look while feeling light and comfortable.
Why Braidless Sew-ins are Beneficial for Hair Health
One big benefit of braidless sew-ins is that they are gentle on natural hair. Unlike regular sew-ins that pull and stress the hair with tight braids, this method avoids tugging and tension on the scalp. This helps lower the chances of hair breakage and loss.
Also, without braids, air can flow better to the scalp. This is good for creating a healthy spot for hair to grow. This can help people who have sensitive scalps that easily get irritated.
It’s important to see a skilled stylist who knows how to do braidless sew-ins. An expert can look at your hair type and give you advice just for you. They can also make sure the application goes safely and supports your hair health.
Beginner's Guide to Braidless Sew-in
Starting your braidless sew-in journey can be fun and exciting. This simple guide gives you the info you need to choose this popular hair extension method wisely.
You'll learn the basics and know what supplies you need. We will guide you through each step. This way, you will feel ready for your big change.
What You Will Need to Get Started
Before you book your braidless sew-in appointment, gather some important supplies. This will help make the process easy and successful. Using quality materials will help achieve a natural look that lasts longer.
Start by picking high-quality wefts of human hair extensions. They should match the length, volume, and texture you want. Human hair extensions let you style them in many ways and blend well with your hair. Check the quality of the wefts. Choose double-drawn or single-drawn, depending on what you like and what you can afford.
Also, buy micro rings or beads that match your natural hair color. Having the right color will help hide the extensions so they look perfectly natural.
Step 1: Preparing Your Natural Hair
Properly getting your natural hair ready is very important for a braidless sew-in installation that looks real. Start by washing and conditioning your hair with products that are right for your hair type. Clean and well-conditioned hair gives a smooth base for the extensions without any knots.
- Washing and Conditioning: Use a clarifying shampoo to clean away product buildup and dirt. Deep condition your hair to bring back moisture and flexibility.
- Detangling: Use a wide-tooth comb or a detangling brush to gently get rid of any tangles or knots.
- Color Matching: If you need to, book a meeting with a stylist. This will help you get the perfect color match between your natural hair and the extensions.
Step 2: Attaching the Hair Extensions
Firstly, section your hair horizontally, starting about an inch above your ears. Clip up the top section to keep it out of the way. Using a tail comb, create a thin, horizontal parting within the bottom section.
Next, take a small section of hair from the parting and thread it through a micro ring. Slide the ring up about an inch away from the scalp. Then, take a small weft of hair extensions and loop it through the ring. Make sure the weft is lying flat against your head.
Using a pair of pliers, firmly clamp the micro ring shut, securing the hair weft in place. Repeat this process, working your way up the head, weaving in wefts, and adding more micro rings as needed.
|
|
Micro Ring Method |
Sew-in Method |
|
Installation Process |
Beads are used to attach wefts to small sections of natural hair. |
Wefts are sewn onto a braided foundation created with natural hair. |
|
Appearance |
Offers a flatter, more natural look. |
Can appear slightly bulky, especially with thicker wefts. |
|
Versatility |
Allows for easy removal and repositioning of wefts. |
Removal requires professional assistance and can be time-consuming. |
|
Cost |
Typically less expensive than sew-ins. |
Generally more expensive due to the labor-intensive installation process. |
|
Maintenance |
Requires regular tightening appointments to prevent slippage as hair grows. |
Requires less frequent maintenance but can be more prone to matting and tangling. |
Maintaining Your Braidless Sew-in

Congratulations on your beautiful new braidless sew-in! To keep your extensions looking great and shiny, you need to take special care of them. The work you put into it is worth it for having amazing hair.
Make sure to gently detangle your hair and wash it properly. Having a regular hair care routine is important. This helps your extensions stay in good shape and avoids tangles and matting.
Daily Care Tips
One important thing to keep your braidless sew-in looking good is using the right hair care products. Choose shampoos and conditioners that are sulfate-free. Sulfates can wash away the natural oils in your hair and make it dry.
Also, it’s important to get a good detangling brush made for extensions. These brushes have flexible bristles that go through your hair easily, which helps avoid snagging or pulling. This means less breakage and shedding. Use a leave-in conditioner or detangling spray to keep your hair soft and easier to manage.
Don’t forget to go to your stylist for regular maintenance. They can check how your extensions are doing, tighten any loose beads, and help with any issues you might have.
When to Seek Professional Help
While you can do some braidless sew-in maintenance at home, you will need a professional stylist for certain issues. Knowing when to call a stylist can help protect your natural hair and make your extensions last longer.
If you see any slippage, notice a lot of shedding, or feel discomfort around the beads, contact your stylist right away. Trying to fix these problems on your own could make things worse and harm your hair.
Also, avoid using heat styling tools on the beads. Too much heat can melt or damage the bonds, causing slippage. Instead, try styling your hair with low-heat settings or let it air-dry when you can to maintain the quality of photo for your final look.
Conclusion
In conclusion, trying a braidless sew-in technique can give you more choices and help keep your hair healthy. If you follow the right steps and tips for care, you can have a stylish look that supports your natural hair's health. Braidless sew-ins are great for different hair types, whether your hair is straight, wavy, or curly. It's important to take care of your hair extensions and get help from a professional when you need it to get long-lasting results. If you want to try this technique, remember to pick good-quality hair extensions to make the final look even better.
Frequently Asked Questions
How long does a braidless sew-in last?
A braidless sew-in can last for 6-8 weeks with good care and regular maintenance by a stylist. But this time can change based on your natural hair growth and how well you take care of your extensions.
Can braidless sew-ins damage my natural hair?
Braidless sew-ins can be a safe and protective hairstyle when a trained and experienced stylist installs them properly. If they are not installed correctly or if there is too much tension on the beads or micro rings, it can cause damage.
Are braidless sew-ins suitable for all hair textures?
Braidless sew-ins are flexible and can be tailored for any hair type. Your stylist will choose the right size and kind of beads or micro rings to secure the hair extensions (bundles). This helps to make sure the fit is secure and comfortable for your hair.
How often should I maintain my braidless sew-in?
It's a good idea to maintain your braidless sew-in every 2 to 3 weeks. Follow your stylist's advice for the best results. Regular care will stop matting, tangling, and slippage. This way, your extensions will look great.
Where can I find quality hair extensions for a braidless sew-in?
Check out our blog for tips on how to find trustworthy suppliers. You can also ask your stylist for their recommendations. It’s essential to do your research and pick high-quality wefts. They should blend well with the color and texture of your natural hair.


