What Are I-Tip Hair Extensions: Everything You Need to Know

The world of hair enhancements and extensions is expansive, offering various solutions for those desiring longer, fuller, or differently styled hair. Among the wide array of options available, one method stands out for its unique application technique and ability to blend seamlessly with your natural hair: I-Tip Hair Extensions.
Unlike other extensions that use glue or stitching, I-tip extensions apply without heat, reducing potential damage to your own hair. Designed for anyone seeking an enhancing change to their current style, these extensions offer extra length, volume, or even a splash of color. With proper care, they remain beautiful and intact for months.
This ultimate guide aims to unravel the mystery of i-tip hair extensions, providing a comprehensive overview of what they are, how they work, their merits and demerits, and how to properly maintain them. Let's get started!
What are I-Tips Extensions?

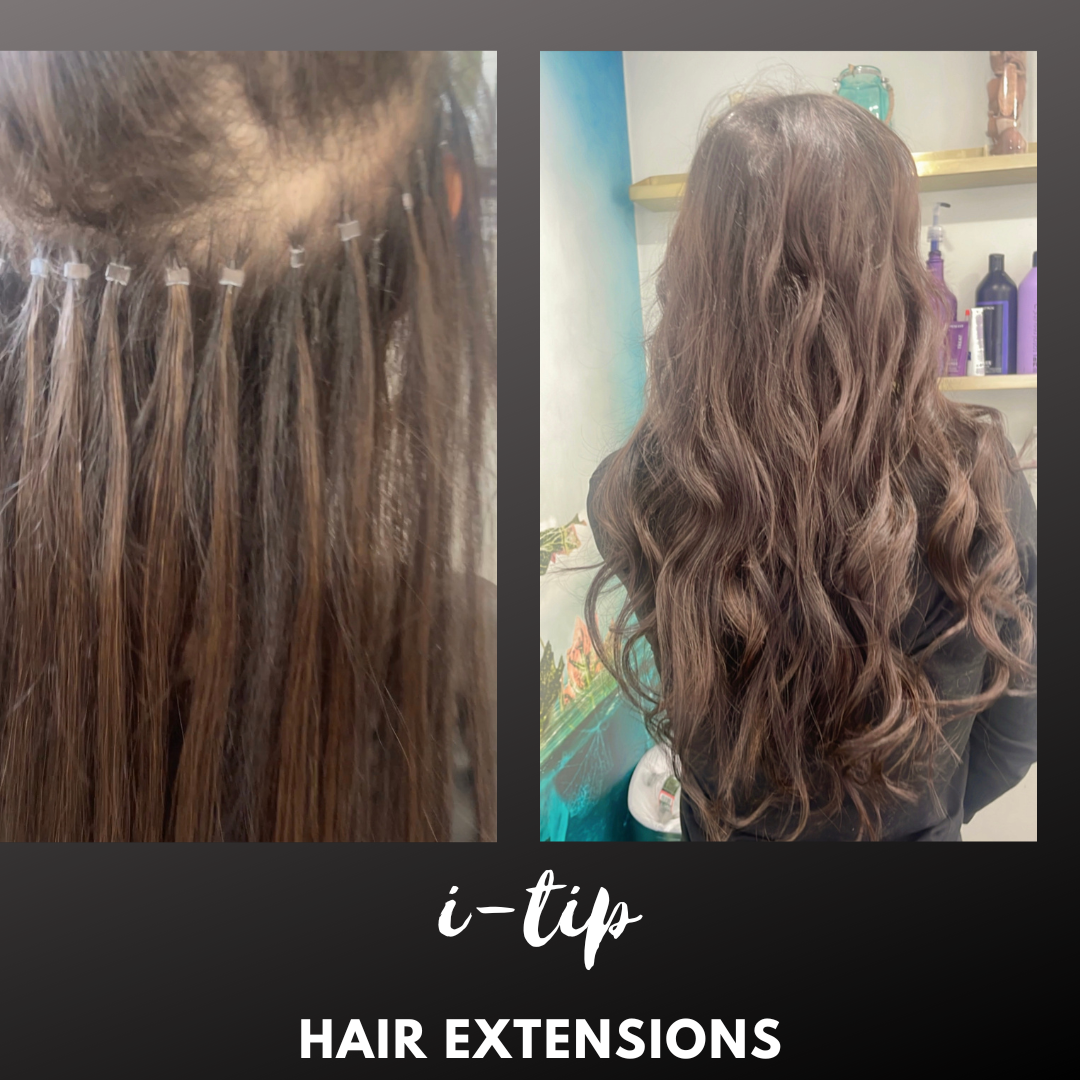
I-tip extensions, also known by other names such as stick tip extensions or micro bead extensions, are strands of human hair extensions topped with a keratin tip shaped like an "I.” Instead of using heat or glue – which can harm natural hair – these extensions are attached via a small, silicone-lined microbead. This bead is clamped flat to hold the extension in place around a small section of the wearer's natural hair. This secure attachment method ensures minimal damage to your tresses while providing a natural look with great versatility and flexibility.
What are the Different Types of I-Tip Hair Extensions?
Within the realm of I-tip hair extensions, you'll find two primary types, each having its own distinct features and ideal users: Remy I-tips and non-Remy/ Synthetic I-tips. Let's understand them in detail.
Remy I-Tips
Remy I-tip extensions are made from the finest quality human hair, where all hair strands are aligned in the same direction, just as they naturally grow. This alignment retains the hair cuticles, reducing tangling and matting while adding a striking shine. Renowned for its ability to blend seamlessly with natural hair, remy hair offers a nearly detectable illusion of natural lushness and length.
Though often a little pricier than their counterparts, their superior quality, natural appearance, and longevity make Remy I-tips worth the investment.
Non-Remy/ Synthetic I-Tips
Non-Remy or synthetic I-tips are another options for those seeking a budget-friendly hair enhancement. Unlike Remy hair, non-Remy hair may not have all cuticles aligned in the same direction, which can lead to tangling. However, advanced synthetic materials now used in the market can often mimic human hair’s look and feel.
While synthetic I-tips might not provide the same natural movement and shouldn't be heat-styled, they can be an excellent option for someone desiring a temporary style change or trying out extensions for the first time.
The I-Tip Hair Extension Installation Process

The process of installing I-tip extensions is pretty straightforward, involving minimal complexity and offering a lesser risk of damaging your natural hair. However, it's worth noting that proper installation is crucial in ensuring the extensions stay in place, look natural and provide optimal comfort. For this reason, having them installed by trained stylists like those at Noelle Salon can significantly enhance the overall experience and results.
Let's quickly walk you through the required tools and materials, as well as the step-by-step installation process of I-tip extensions.
Required Tools and Materials
For the successful application of I-tip extensions, certain tools and materials are necessary for the procedure:
- I-tip Hair Extensions: These are the actual hair strands you'll be adding to your natural hair.
- Micro Rings or Beads: These are used to secure the I-tip extension to your own hair.
- Loop tool: Used for threading your natural hair through the micro ring.
- Pliers/Extension Clamp tool: An essential tool for clamping the bead securely around your hair and the extension.
- Comb and Sectioning Clips: These are useful for separating your hair into sections and maintaining organization during application.
- Heat Protectant: Necessary when styling extensions using heat.
Step-by-Step Installation Guide
Installing I-tip hair extensions involves a precise but straightforward process, best done by a professional stylist:
Step 01: Preparation
- Cleanse Your Hair: Thoroughly wash and dry your hair to ensure a clean base for the extensions.
- Section Your Hair: Divide your hair into manageable sections, starting from the lower part of your head and working your way up. This will make the installation process more organized and efficient.
Step 02: Extension Application
- Create a Section: Isolate a small section of your natural hair, usually about the width of your finger.
- Thread the Hair: Using a specialized tool, thread a small loop of your natural hair through the micro ring.
- Attach the Extension: Insert the I-tip hair extension into the micro ring, aligning it with your natural hair.
- Close the Ring: Using a pair of pliers, carefully close the micro ring, securing the extension to your natural hair.
- Repeat the Process: Continue this process, section by section, until you achieve your desired volume and length.
Step 03: Final Touches
- Style Your Hair: Once all the extensions are securely in place, you can style your hair as desired.
- Regular Maintenance: Follow your stylist's advice for proper care and maintenance, including regular brushing and professional adjustments.
Proper installation ensures your I-tip extensions blend seamlessly with your natural hair, yielding a natural look with less potential damage to your locks.
What are the Pros and Cons of I-Tip Hair Extensions?
While I-tip hair extensions offer numerous benefits, they also come with potential drawbacks. Understanding both the advantages and disadvantages can help you determine if they're the right choice for you. Here are the most common advantages and disadvantages of I-tip hair extensions:
Advantages
Here's a list of the key advantages you can expect when opting for I-tip hair extensions:
- No Heat or Glue: This feature minimizes the chances of damaging your natural hair during the application process.
- Natural Look: Due to the seamless blending with your own hair, they offer a highly natural look.
- Versatile Styling Options: You can enjoy numerous styles with I-tips, including casual everyday looks and elaborate styles for special occasions.
- Durability: I-tip extensions can last up to six months with quality care and regular maintenance.
Disadvantages
Now, let’s talk about some potential disadvantages of I-tip hair extensions:
- Time-Consuming Application: The process of installing I-tip extensions can be quite time-consuming, especially if a significant volume or length increase is desired.
- Regular Maintenance: Regular maintenance is required to keep the extensions in top shape, including salon appointments every six to eight weeks.
- Upfront Costs: High-quality I-tip extensions and their professional installation carry a considerable upfront cost.
- Not Ideal for All Hair Types: Extremely fine or weak hair might not be suitable for I-tip extensions, as the weight of the extensions can strain fragile hair.
How to Maintain and Take Care of I-Tip Extensions?
To ensure they look their best and last as long as possible, proper care and maintenance are essential. Here are some tips to keep your extensions looking fabulous.
Washing and Conditioning
Proper washing and conditioning are crucial to ensure your extensions' longevity. When washing, gently massage a sulfate-free shampoo along the scalp using vertical strokes, avoiding any twisting or scrubbing that could lead to tangling. Conditioner should only be applied from the mid-length to the ends, keeping it away from the roots to prevent the loosening of the bonds. Rinse thoroughly with lukewarm water, ensuring no residue is left. Regular conditioning helps maintain the natural movement and shine of your extensions.
To minimize potential damage, opt for products specifically designed for hair extensions and avoid excessive heat styling. Remember, a well-maintained mane exudes a natural look and feel, enhancing your overall appearance effortlessly.
Styling Guidelines
To maintain the natural movement and longevity of your I-tip hair extensions, following proper styling guidelines is essential. When styling your extensions, opt for heat tools at a lower temperature to prevent potential damage. Avoid excessive pulling or tugging, especially near the attachment points, to ensure a secure hold without risking shedding.
Embrace the versatility of I-tip extensions by experimenting with different hairstyles that complement your natural hair texture. Regular brushing with a gentle hand will help preserve the lifespan of your extensions while maintaining a natural look.
Remember to consult your trained stylist for personalized styling tips tailored to your specific hair type and desired look.
Experience the Magic of I-Tip Hair Extensions at Noelle Salon
Want to experience the transformative magic of I-tip hair extensions? Visit Noelle Salon, where we specialize in applying these miraculous hair extensions. Our team of professional stylists is well-trained and equipped with all the necessary tools and techniques required to install your I-tip extensions perfectly. We provide impeccable service coupled with top-quality Remy I-tip extensions that blend seamlessly for a flawlessly natural look.
Whether you're seeking subtle enhancement or outright transformation, Noelle Salon can guide you on your exciting journey to stunning, voluminous locks with I-tip hair extensions.
Book an appointment today or contact us for further queries.
Final Words
I-tip hair extensions offer a versatile solution for enhancing your hair's length and volume. Their natural appearance and minimal damage to your natural hair make them a popular choice.
However, they do require regular maintenance and professional installation. Before choosing I-tip extensions, consider your lifestyle and consult with a stylist to ensure they are the right choice for you. With proper care, I-tip extensions can provide a beautiful and long-lasting solution for achieving your desired hair goals.
Frequently Asked Questions
Can I swim with I-tip hair extensions?
Yes, you can swim with I-tip hair extensions, but it's recommended to wear a swimming cap to protect them. Keep in mind that frequent exposure to chlorinated or salt water can potentially decrease the lifespan of your extensions.
How long do I-tip hair extensions last?
With proper care and regular maintenance check-ins with your stylist, I-tip hair extensions can last anywhere from 3 to 6 months before needing repositioning or replacement. Their longevity makes them a durable and cost-effective solution for long-lasting hair enhancements.
Are I-tip hair extensions suitable for all hair types?
I-tip extensions generally work best with medium to thick hair. However, they may not be ideal for those with particularly thin or fragile hair, as the weight of the extensions could cause strain or damage. Always consult with a professional stylist before choosing hair extensions.
How many strands of I-tip hair extensions do I need for a full head?
The number of I-tip hair extensions required can vary based on your hair thickness and desired volume. On average, thin hair may require 4-5 packs, while thicker hair may need 6-9 packs. A professional stylist can guide you in determining the amount needed for a full head.
Can I reuse my I-tip hair extensions?
Yes, with proper care, I-tip hair extensions can be reused. Once the extensions have grown out, they can be removed, moved up, and reinstalled, ensuring their utilization for an extended period and making them a cost-effective method.
Can I color my I-tip hair extensions?
I-tip hair extensions can be colored if they are made from high-quality human hair. To prevent damage, however, it's recommended to have them colored professionally. Always conduct a strand test beforehand, as extensions may process color differently than natural hair.


